Developer Guide
Table of Contents
Acknowledgements
In this project, we have referenced the following list of materials:
We have used the following third-party libraries:
- ical4j
- Version 3.1.3
- To read .ics files for easy addition to the module list.
- SLF4j NOP
- Version 1.7.25
- To remove runtime logging warning messages that result from using ical4j.
Design & Implementation
Main Menu
This section describes the implementation of core main menu features.
API: AllOnUs.java
The menu is accessed through a call to static method main() of the AllOnUs class.
The Class Diagram below shows the overall structure of the application from the menu’s point of view.
The AllOnUs class and other classes that are coupled to the menu are therefore included.
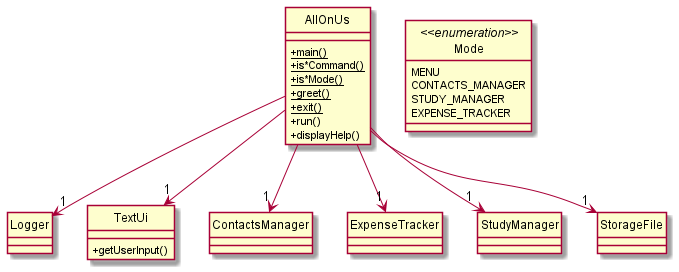
Note: Exception classes are left out of this diagram that aims to show the core structure of the application. is*Command()
and is*Mode() methods here refers to all methods of these forms (more on this will be elaborated later in detail).
As illustrated in the Class Diagram above, the AllOnUs class only associates to one of each of the other classes.
These classes are, namely:
ContactsManagerclass which manages the contacts section of the applicationStudyManagerclass which manages the module and timetable part of the applicationExpenseTrackerclass which manages the expenses section of the applicationStorageFileclass which manages the loading and storing of application related dataLoggerclass which helps with logging information about the state of the programme when it is runningTextUiclass which handles user input from command line.
Now we will look at the sequence of operations that take place upon a call to method main() of the AllOnUs class.
Below is a sequence diagram that shows the core interactions between associated classes and objects in the execution
and runtime of the programme.
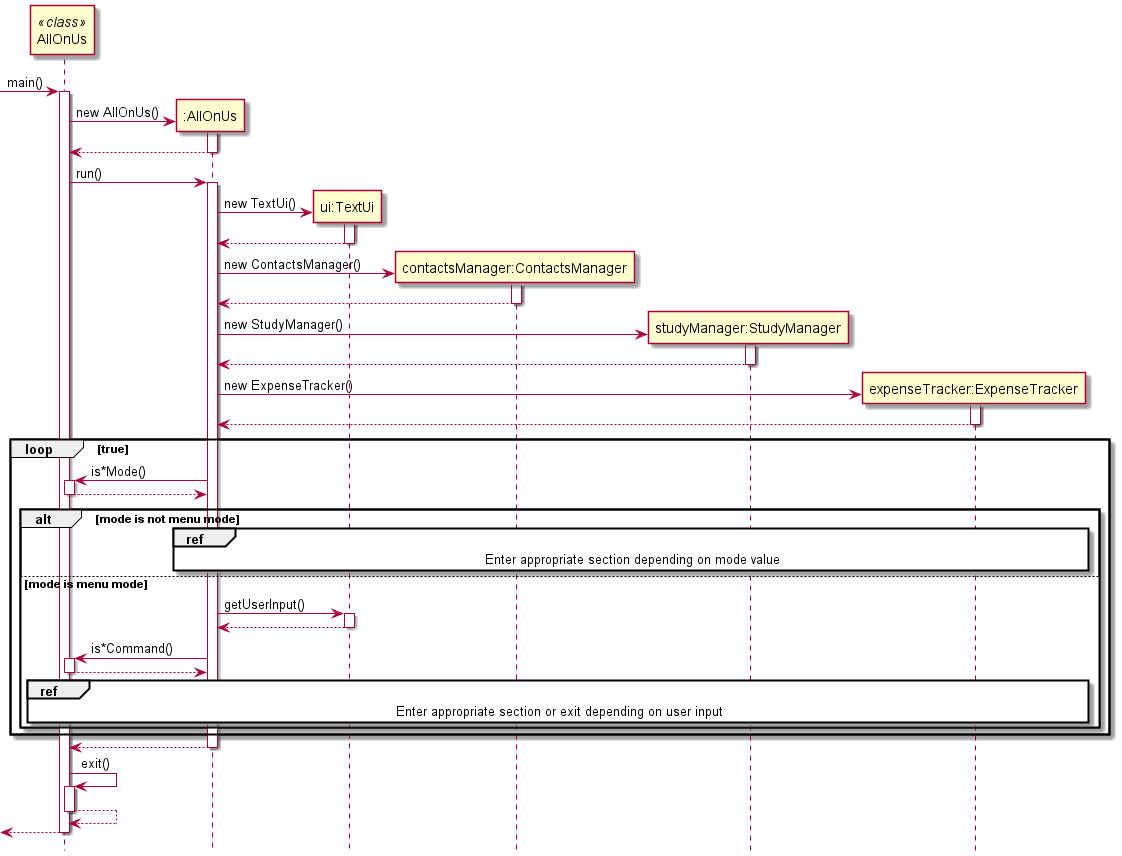
As illustrated in the diagram, once main() method of AllOnUs is called, a new unnamed :AllOnUs object is created
for which we execute the non-static method run(), which contains a loop for sustained interaction with the user
(command line). Objects for the ContactsManager (contactsManager), StudyManager (studyManager),
ExpenseTracker (expenseTracker), StorageFile (storageFile) and TextUi (ui) classes are also created,
where Logger (logger) object is already contained in the relevant field of the :AllOnUs object.
Once the run() method is called, the program enters a loop with the following sequence:
1) is*Mode() method is called with parameter mode of enumeration Mode. If mode has value not corresponding to
menu mode, step 2 executes. Else, step 3 executes.
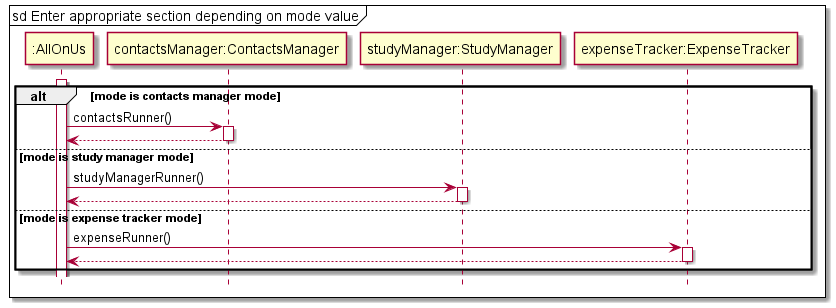
2) either of expenseRunner() (belongs to expenseTracker), studyManagerRunner() (belongs to studyManager) or
contactsRunner() (belongs to contactsManager) methods is called depending on mode value.
3) getUserInput() method is called, which belongs to object ui, and then checks the returned string for
whether it is a command to enter a particular section (essentially step 2), to get help, to exit the application or
is an empty or unrecognizable command.
Steps 1 and 2:
mode can only take 4 possible values which are reflected in the class diagram above in the Mode enumeration.
mode = MENUsignifies that the program is currently in menu mode and should execute normally (i.e. step 3 above).mode = CONTACTS_MANAGERsignifies that menu interaction with the user should not occur and control should be given tocontactsManagerobject (call to runner method of this object).mode = STUDY_MANAGERsignifies that menu interaction with the user should not occur and control should be given tostudyManagerobject.mode = EXPENSE_TRACKERsignifies that menu interaction with the user should not occur and control should be given toexpenseTrackerobject.
mode is updated upon every return from a method call to any of the manager/tracker objects. This allows for user to indicate
whether they actually want to return to the menu (mode is set to MENU when user enters menu command in any of the other sections)
or want to enter another section of the application (mode is set to any other value of mode when user enters a valid goto command
in any of the other sections) from the section they entered the command from. The mode value is checked by calls to methods of
the form is*Mode() which are isContactsManagerMode(), isStudyManagerMode() and isExpenseTrackerMode().
For example, if user is currently in expense tracker (runner method of expenseTracker is executing) and user wants
to return to menu, the return value of the runner method will update mode to MENU for the next iteration in the
menu (step 3 executes). If the user, say, wants to jump to the study manager, the return value of the runner method
will update mode to STUDY_MANAGER and control will switch to the study manager (runner method of studyManager
is called), which is essentially step 2.
Step 3:
Once the user enters a command, getUserInput() returns a string userInput which becomes a parameter for a function
call to static method is*Command(), which belongs to the AllOnUs class, and the is*Command() method is of the
form isStudyManagerCommand(), isContactsManagerCommand() and isExpenseTrackerCommand(), isHelpCommand(),
isExitCommand() and isEmptyCommand() which are called in a certain sequence. These methods return boolean values
which indicate whether userInput is a command concerning either of the following actions.
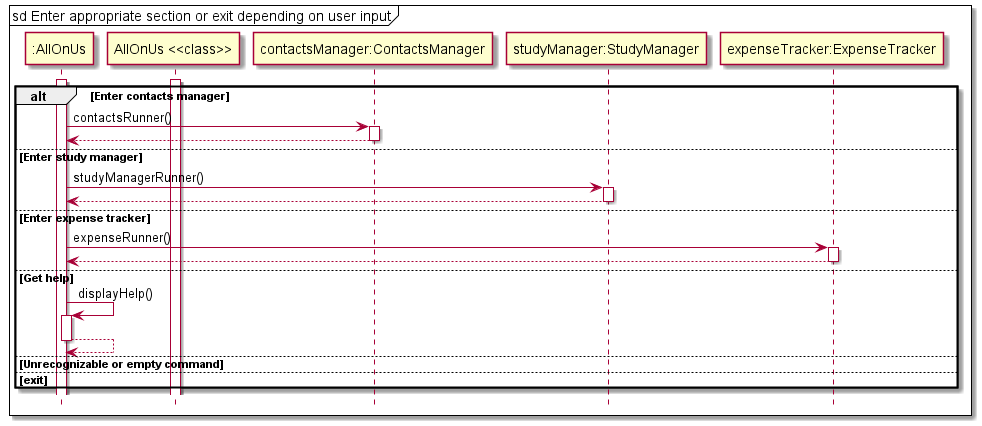
- Command to enter a particular section:
- Either
isContactsManagerCommand(),isStudyManagerCommand()orisExpenseTrackerCommand()returnstrue(called in that order) and execution depending on which method returnstrue, the runner method of the respective object is called (control switches to one of the managers/tracker). - After the runner method is done executing, the updated
modevalue is returned to therun()method of:AllOnUs object.
- Either
- Command for help section:
- If the
isHelpCommand()method returnstrueonuserInput, thedisplayHelp()method is called which displays the help section to the user and then returns to therun()method.
- If the
- Empty or unrecognized command:
- When
userInputis empty (isEmptyCommand()returnstrue), execution continues to the next iteration of the loop. This is essentially similar to a “pass” statement as when the user does not input anything, the application silently waits for the user to input something into the command line. - When there is an unrecognized command (returns
falseon all the methods of typeis*Command()), the application prompts the user through a function call to a static methodprintInvalidMainMenuCommandMessage()(belongs toAllOnUsclass and not included in the diagrams above) to enter a known command and suggests referring to the help section.
- When
- Exit command:
- If the
isExitCommand()method returnstrueonuserInput, the loop breaks, and control is returned to the staticmain()method of theAllOnUsclass, which then calls the staticexitmethod in the same class to print a termination message, and then finally control is returned to the OS.
- If the
Modules
Study Manager component
API: StudyManager.java
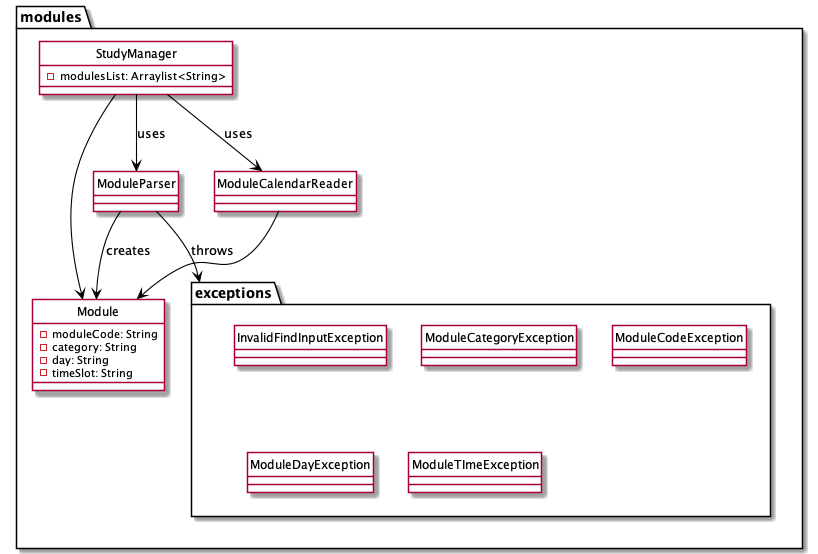
The StudyManager component,
- Stores the academic schedule, i.e. all
Moduleobjects are contained in amodulesListobject. - Integrates
ModuleParser.java,ModuleCalendarReader.java,Module.javaand packageexceptionswith the rest of the application. - The storage is bound to
modulesListlist such that everytime a change is observed in the list it is saved on to a file. - Does not depend on other components like
ExpenseTrackerandContactsManager.
How StudyManager works:
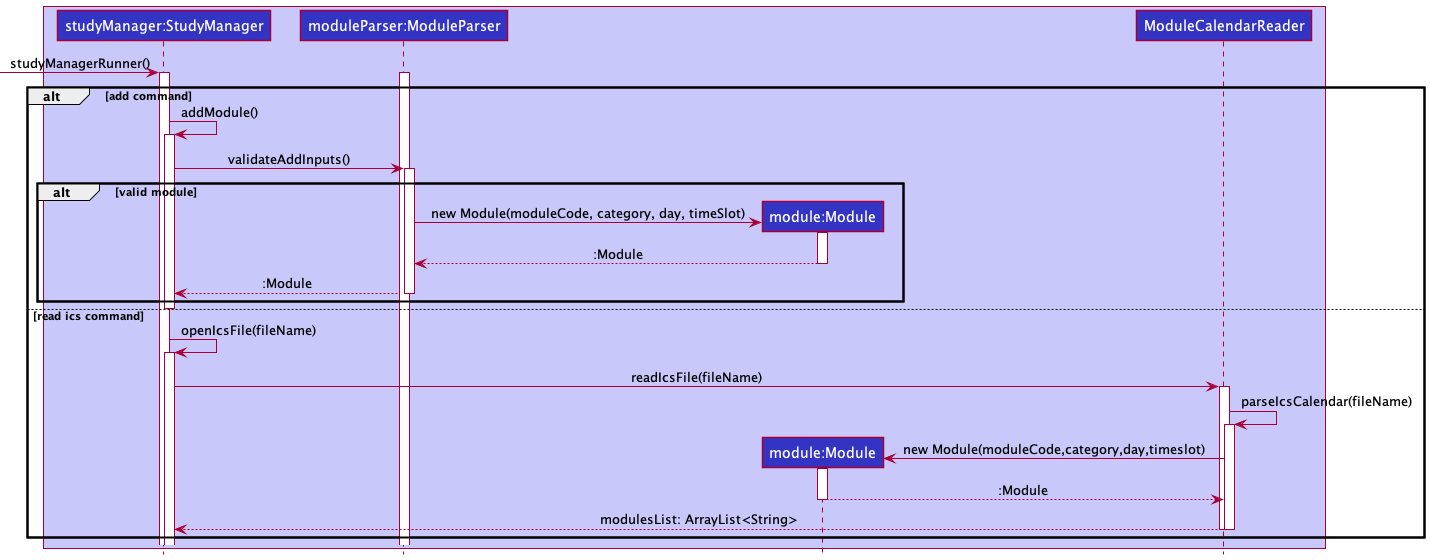
- Based on a command entered by the user, StudyManager can perform the following functions
addlistdeleteeditfindread ics
- The
StudyManagerclass makes use of theModuleParserclass to validate user inputs andModuleparameters.- If there are any errors in the entry of
Moduleparameters they are handled by the various exceptions in theexceptionspackage.
- If there are any errors in the entry of
- There are two ways to add to the
moduleListto keep track of academic schedule- Either the user can choose to add the modules one by one. (See user guide for add feature)
- Or the user can choose to read from NUSMods .ics calendar file of their academic schedule.
(See user guide for
read icsfeature)- This is more convenient as it can add multiple modules at a single go.
- This feature makes use of the
ModuleCalendarReader.javaAPI.
The two ways to add modules are illustrated in the sequence diagram below:
ModuleCalendarReader Component
API: ModuleCalendarReader.java
Makes use of external library ical4j to parse calendar files of .ics type from NUSmods.
- The necessary details like module code, module class time, module category and module day are taken from this file and parsed.
- The timezones are originally in UTC which are converted to Singapore timezone.
- The data is represented in a format that is used throughout the application for module paramters.
- They are then loaded into a
ArrayList<Module>and returned for use inStudyManager.java.
ModuleParser Component
API: ModuleParser.java
- Used to parse user inputs and to validate input module parameters for add and edit functions, as well as to validate search query for find functions.
- Throws exceptions in package
exceptionsif there are any invalid inputs.
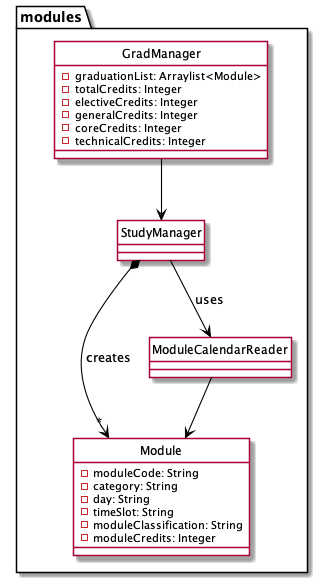
[Proposed] Graduation Tracker Feature
Every semester the user can add the modules they have taken so far. This becomes easier with the read ics feature.
This can then be used and compiled to form the graduation requirements check list.
More parameters could be added to the Module class like moduleCredits and moduleClassification
which would signify a module’s credits and classification into UEM, GE, core and TE breadth or TE Depth.
A new class called GradManager could be created. A new ArrayList<Module> called graduationList could be created,
such that the user can add their modules to it once every semester. This list could show important details that could
be set by the user such as total number of credits needed amd the number of credits in each moduleClassification.
Based on the moduleCredits and moduleClassification the number of credits in each module classification can easily be calculated.
This list can then be used to track the user’s graduation requirements and as a checklist to plan their remaining modules.
The suggested architecture has been detailed in a class diagram depicted below:
[Proposed] Module Task Management Feature
Each module at NUS usually has a set of deliverables like assignments, exam dates, projects. This could be integrated
into a task manager (similar to Duke) such that each module has a task list where the user can add any tasks that they
would associate with that particular module.
The architecture of the taskList has been detailed in a class diagram depicted below:
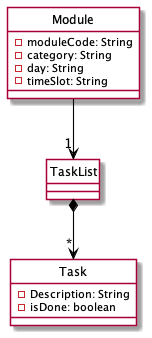
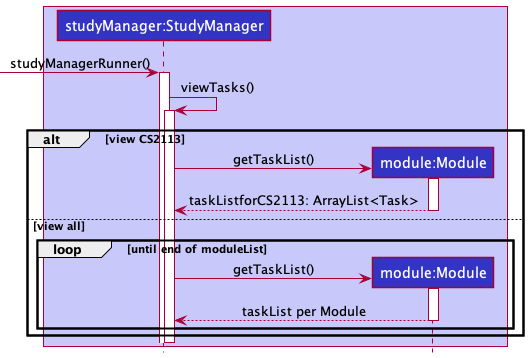
StudyManager can offer functions to view the combined task list for all modules or to just view for a specific module.
A sample implementation has been demonstrated in the sequence diagram depicted below.
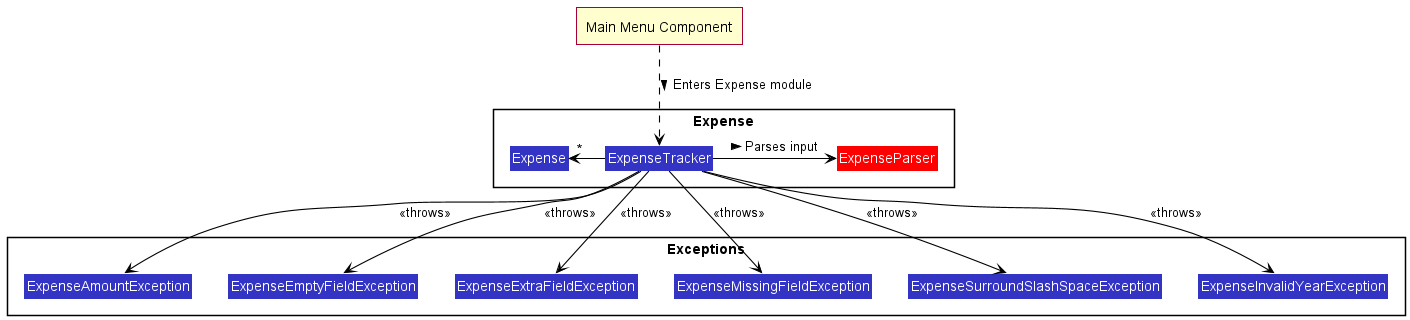
Expense Tracker Component
The ExpenseTracker component consists of the ExpenseTracker class, ExpenseParser class and multiple
custom Exception classes.
The ExpenseTracker class provides the main runner for the Expense module of AlloNUS. expenserunner() reads
in user commands and interacts with the ExpenseParser class depending on what the user has typed in. The
ExpenseParser class either returns with the parsed result or with a custom exception, in which the
ExpenseTracker class continues validating the inputs of the user before executing the user’s commands.
How the Expense Tracker component is used:
- From the Main Menu, if the user decides to run
goto Expense_Tracker, theExpenseTrackerclass takes over. - The
expenseRunner()method begins by taking in user inputs depending on the user’s requirements. Some examples of valid commands include add, delete, list, edit and find. - Depending on the user’s input, the
ExpenseParserclass callsparseXYZExpensewhereXYZis a placeholder for the specific command name (eg.parseDeleteExpense). - If the parsing is valid (i.e. user followed the format of the command properly), the appropriate field values
are returned to the
ExpenseTrackerclass. - The
ExpenseTrackerclass takes these fields and validates them depending on the type of command entered by the user in Step 2. (eg. if anaddcommand is issued, theExpenseTrackerclass checks if the Date is formatted properly) - After validating all checks, the command is executed accordingly within the
ExpenseTrackerclass.
The Sequence Diagram below illustrates how the ExpenseTracker class operates if the user decides to add a new expense record:
![]()
[Proposed] Budgeting Reminder Feature
The proposed budgeting reminder feature is facilitated by ExpenseTracker and Expense class, which adds a
private variable kept within the Expense class called budget. Additionally, it implements the following
operations:
Expense#setBudget(int)— Sets the current budgetExpense#getBudget()— Get the current budget leftExpenseTracker#enable(int)— Turns on the budgeting mode which restricts exceeding of budget when adding new expense records. It also sets the budget specified by the user.
Users may choose to enable the Budgeting feature via the command enable followed by the amount of budget
allocated in total. E.g enable 3000.
Whenever a new Expense record is added, the addExpense method of the ExpenseTracker class will check against
the current available budget and whether the expense record will cause the budget amount to be exceeded. If it
exceeds, the addition of the new expense record will be rejected.
If the enable feature is turned on with existing records in the list, the enable method will run through the
current list of expense records and deduct from the budget accordingly. If it already exceeds the budget, the user
will be forced to delete records until the budget is kept, or increase the budget accordingly.
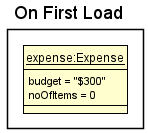
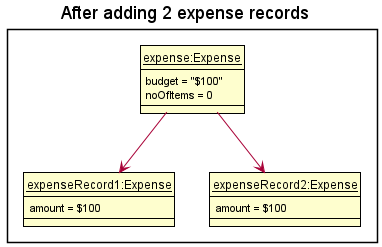
Given below is an example usage scenario on how the Budgeting Reminder Feature works:
Step 1: The user navigates to the Expense Tracker for the first time, and decides to set a budget of $300.
Step 2: The user proceeds to add 2 expense records, each with an amount of $100.
Step 3: The user now tries to add 1 more expense record with an amount of $200. This exceeds the budget and hence the addition will not be processed.
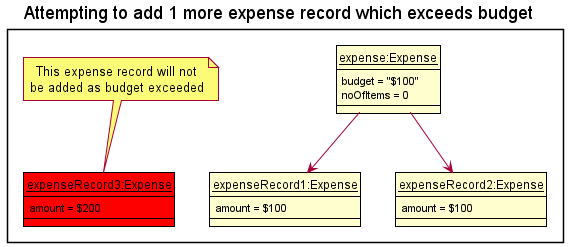
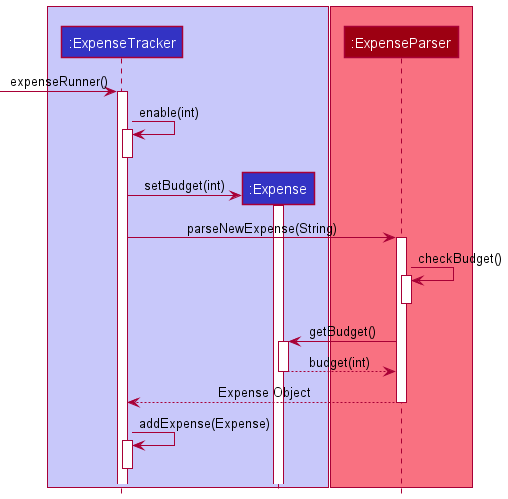
The following sequence diagram shows how the budget is checked upon every new addition of expense records:
Contacts
Contacts Manager Component
This section describes the design and implementation of Contacts Manager features.
API: ContactsManager.java
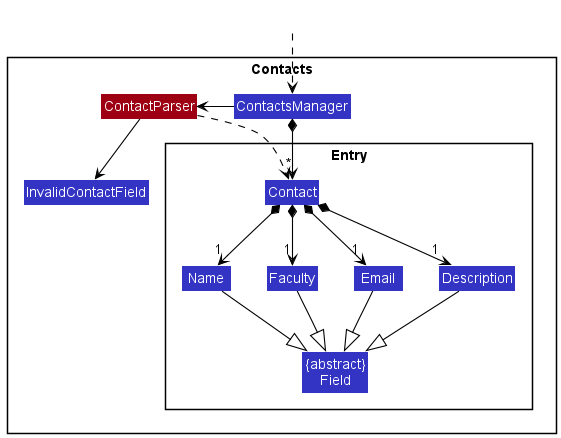
The ContactsManager component:
- stores the Contacts Manager data, i.e. all
Contactobjects are contained in the contacts list, stored as a private class variable within aContactsManagerinstance. - each
Contactobject has four fields,Name,Faculty,Email, andDescription. These four classes inherit from the abstract classField. - calls methods in the
ContactParserclass to parse user inputs and make the relevant edits to the contacts list - when invalid inputs are supplied and parsed, the
ContactParserclass throws anInvalidContactFieldexception
Contact Parser Component
API: ContactParser.java
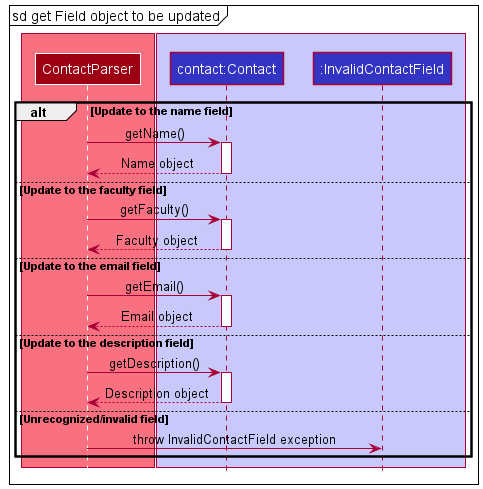
The Sequence Diagram below illustrates interactions between classes of objects
for the static setContactFields(contact, fieldStrings) API call. Note that
the portions of this API call related to load, save, and showing messages to users
are abstracted away and left out in this sequence diagram.
This API call is used both for adding a new contact, and for
editing existing contacts. When adding a new contact, an empty Contact object
is supplied as an argument to setContactFields(), along with any strings of
fields found in the user input.
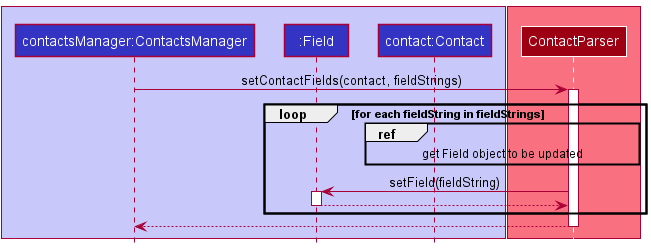
For each string in the array fieldStrings, the method identifies
which contact field the string corresponds to, get a reference to the
Field object from contact, and then uses the polymorphic setField()
call to update the value of the corresponding field of contact.
Decisions made about data validation in parsing:
- We generally have loose data validation checks for all
Contactfields. This is to give users the flexibility to enter placeholders or additional information as they see fit, instead of preventing them from entering more customized information if we prevent entering certain symbols. - Name:
- We opted to not check for anything but duplicated names in our data validation for the name field.
- This is case-insensitive.
- However, in the case of editing an existing contact, we allow users to update
a name even if the new name is the same as the old name, if both are converted
to lowercase. This is in case users want to edit a name from
janetoJane, as an example.
- Email:
- We check for the email format of
XXX@XXX.XXX, whereXcan be any character. - However, even for emails that do not follow this format, we allow users to enter them as valid fields. This is in case users want to enter a placeholder when they don’t know someone’s email, or if they want to enter multiple emails, etc.
- We check for the email format of
- Faculty:
- We considered limiting faculty fields to only NUS faculty names, or check that only alphabetical characters are entered.
- However, our target user (an NUS student) may also have friends outside of NUS, or, certain NUS faculty names include non-alphabetic characters (e.g. Duke-NUS, FoS/SoC DDP).
- Therefore, we ultimately did not implement any data validation checks for this field.
- Description:
- The same rationales apply. We do not have data validation checks in place to give our users a larger degree of freedom.
Load and Store
API: StorageFile.java
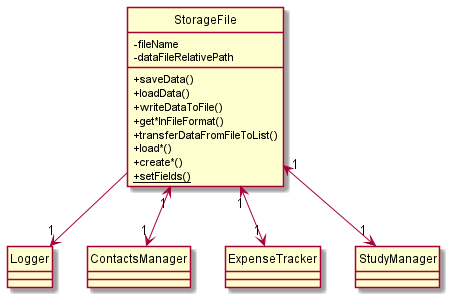
Note: Exception classes are left out of this diagram that aims to show the core structure of the load-save functionality. TextUi class is also left out since it is used once for printing an error message. Some methods and attributes are not mentioned to keep the diagram simple while keeping the core information visible.
As seen from the class diagram above (which shows the portions relevant to the StorageFile class),
the StorageFile class associates to a Logger class, a ContactsManager class, an ExpenseTracker class
and a StudyManager class. The AllOnUs class (to do with main menu) associates to a StorageFile class (not shown in class diagram)
and the manager and tracker classes associate to the StorageFile class as well.
The StorageFile class has private attributes fileName and dataFileRelativePath which define the name of the file
and the relative path of the file to project directory, which are utilized in creating/locating the file by the
StorageFile class. More details on this will be discussed soon.
All the methods in this class are public and the
only static method setFields() is utilized by class AllOnUs to initialize the StorageFile class with instances of
the ContactsManager, ExpenseTracker and StudyManager classes (used in the application) and the file related attributes.
get*InFileFormat(), load*() and create*() methods represent multiple methods that adhere to the respective forms
and will be discussed further as needed.
We first talk about the save functionality.
Save
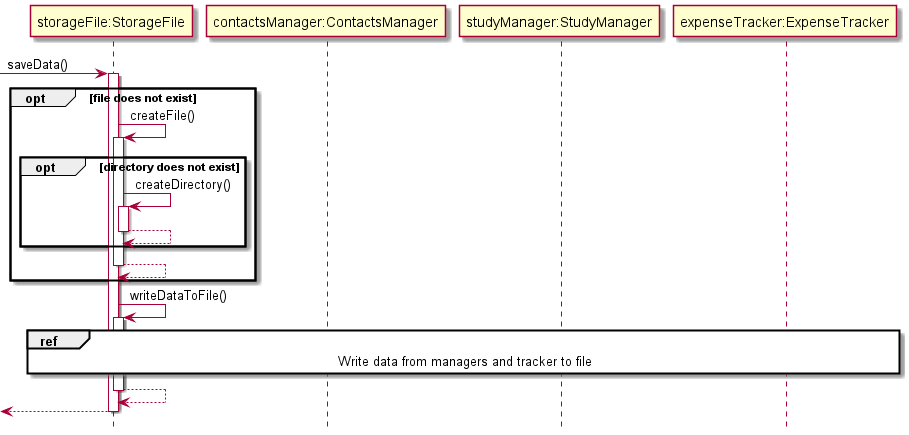
Upon any modification to the lists maintained by the manager or tracker objects, a boolean isModified is changed to
true (initially false at the start of every iteration of interaction with the user) and this triggers a call to
the saveData() method of the StorageFile class. If the file for saving does not exist, it is created. While creating
the file, if it is discovered the directory does not exist either, it is created first. These are done through calls to
createFile() and createDirectory().
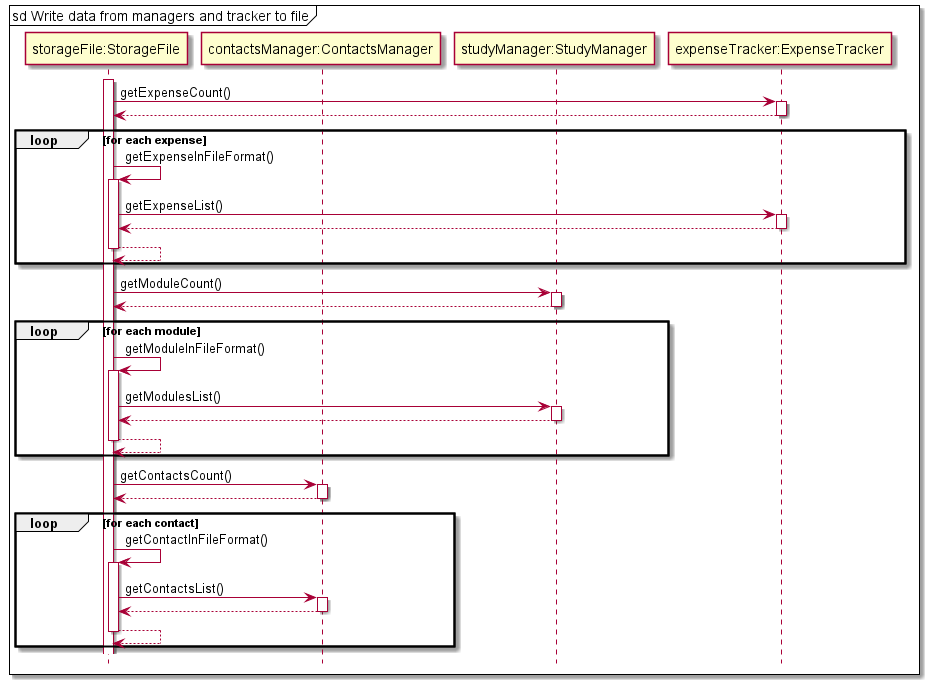
The total number of expense items maintained by the expense tracker is then obtained through a call to getExpenseCount()
which is a method of the ExpenseTracker class. For each of these items, we get a file representation of this expense item
through a call to getExpenseInFileFormat(), which obtains the specific expense item through a call to getExpenseList()
and this item is converted into file format. The expense item entry is then written to the file in append mode and is
now considered “saved”. These steps are repeated for module items managed by study manager and contact items managed
by contacts manager.
After all entries have been saved, control returns to where the saveData() method was called from so that interaction
with the user can resume.
Load
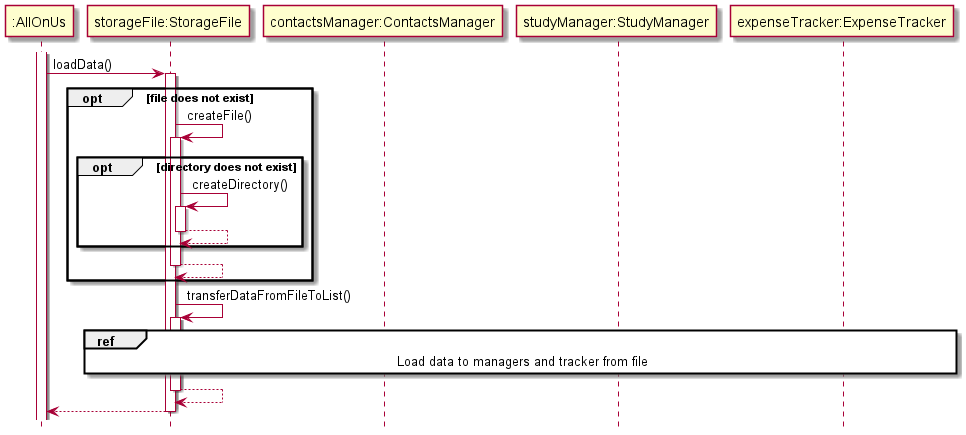
This feature is only executed at the start of the application when we need to load the data stored on a file into our
application. The loadData() method of StorageFile class is called by the run() method of AllOnUs class before
entering the user interaction loop of the main menu. There is then a self-invocation of transferDataFromFileToList(),
which opens the file to be loaded from before reading data from it. In the event the file does not exist, an exception
FileNotFoundException is raised which is caught by the loadData() method and the file creation process described
earlier occurs before a call to transferDataFromFileToList() again. In the sequence diagram above, this mechanism
is described using “opt” to simplify the diagram but the outcome is equivalent to what is actually happening.
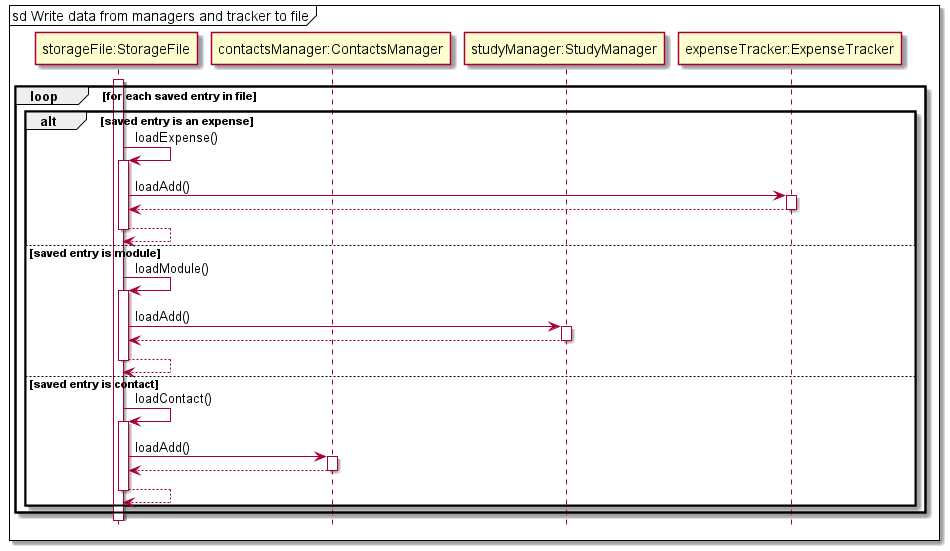
Once transferDataFromFileToList() is called (assuming the file is created by now, or the process above would repeat),
each entry in the file is read and using a simple “if-else” clause we can determine whether the entry is an expense,
a module or a contact (format of saved entry is specific to entry type). If it is an expense, loadExpense() is called
which then calls loadAdd() belonging to the ExpenseTracker instance representing the expense tracker of the application.
loadAdd() then calls the local method used for addition of expense entries into the locally maintained list.
Here, we can see that the loading mechanism essentially relies on the underlying (already existing) item addition mechanisms
that the manager and tracker classes possess to load entries correctly.
Similar operations occur for entries of type module and contact.
Once all the entries have been loaded and there are no more lines to be read, the loop breaks and control returns to
the run() method of :AllOnUs, so that interactions with the user can begin.
Appendix
Product scope
Target user profile
- NUS undergraduate students
- has a need to manage their academic schedule
- has a need to manage their expenses as a student
- has a need to manage a significant number of contacts
- prefer desktop apps over other types
- can type fast
- prefers typing to mouse interactions
- is reasonably comfortable using CLI apps
Value proposition
This product helps NUS students who are struggling to keep track of their classes,
expenses and networking centrally. It is a standalone product that works solely
on data provided by the user. It also allows for parsing .ics files downloaded from NUSMods.
It solves the basic needs of a student such as managing academic schedule, expenses and contacts faster than a typical mouse driven or GUI driven apps.
User Stories
| Version | As a … | I want to … | So that I can … |
|---|---|---|---|
| v1.0 | new user | see usage instructions | refer to them when I forget how to use the application |
| v1.0 | user | add a new module | refer when I am not sure what is on my schedule right now |
| v1.0 | user | list all modules | get a list of all my modules in one place |
| v1.0 | user | delete a module | remove modules or tasks that I am done with |
| v1.0 | user | add a new expense | keep track of my expenditure |
| v1.0 | user | list all expenses | get a list of all my expenses in one place |
| v1.0 | user | delete an expense | remove expenses that I do not need to track |
| v1.0 | user | add a new contact | keep track of my contacts |
| v1.0 | user | list all contacts | get a list of all my contacts in one place |
| v1.0 | user | delete a contacts | remove contacts that I do not need to track |
| v2.0 | user | find a module by name | locate a module without having to go through the entire list |
| v2.0 | user | edit a module | change details for my existing modules to ensure consistency |
| v2.0 | user | find an expense | locate an expense without having to go through the entire list |
| v2.0 | user | edit an expense | change details for my existing expenses |
| v2.0 | user | find a contact | locate a contact without having to go through the entire list |
| v2.0 | user | edit a contact | change details for my existing contacts |
| v2.0 | user | parse modules from NUSMods | easily add all my modules with a single command |
| v2.0 | user | save and load entries from a session | reload my entries from the previous session |
Non-Functional Requirements
- Application should work on any mainstream operating system that has Java 11 or above
- Application should work ideally for users who type fast, yet no need for users to have prior programming background
- Application should be able to perform load and store operations on any mainstream operating system without difficulty.
Glossary
| Terms | Definition |
|---|---|
| Main Menu | The Main Menu the user interfaces with to access the 3 components: ContactsManager, ExpenseTracker and StudyManager |
| Contacts | The Contacts component which manages a list of contacts added by the user. It facilitates the adding, deleting, editing and finding of contacts as well. |
| Expense | The Expense component which manages a list of expense records added by the user. It facilitates the adding, deleting, editing and finding of expense records as well. |
| Modules | The Modules component which manages a list of expense records added by the user. It facilitates the adding, deleting, editing and finding of classes as well. |
| Storage | The Storage class responsible for the saving to and loading from the save file respectively. |
| TextUi | The TextUi class deals with all things related to printing and reading of lines for the user to interface with. |
| Parser | Each component has their own respective parser, which makes sense of the user’s input before executing them. |
Instructions for manual testing
Given below are instructions to test the app manually:
Note: These instructions only provide a starting point for testers to work on; testers are expected to do more exploratory testing.
Launch and Shutdown
- Initial launch
- Download the jar file and copy into an empty directory.
- Using command line, navigate to the above directory and execute the jar file.
- Shutdown
- Navigate to menu using
menucommand. - Enter
exitcommand to appropriately terminate the application.
- Navigate to menu using
Study Manager
- Deleting a module while all modules are shown.
- Prerequisites: List all modules using the
listcommand. Ensure there are multiple modules in the list. - Test case:
rm 1- Expected: First module is deleted from the list. Details of the deleted module shown in status message.
- Test case:
rm 0- Expected: No module is deleted from the list. Error details shown in the status message.
- Other incorrect delete commands to try:
rm,rm 100000- Expected: Error message similar to step 3.
- Prerequisites: List all modules using the
- Adding a module to the list.
- Requires module code, category, day and time.
- Test case:
add m/CS2113 c/lec d/Thursday t/2:00 pm-4:00 pm- Expected: Module is added to the list and details are shown on the console.
- Test case:
add m/CS2113- Expected: No module is added to the list. Error details are shown on console.
- Other incorrect add commands to try:
add,add c/lec t/4pm-6pm- Or any commands that exclude one of the four requirements to add module.
- Expected: Error message similar to above.
Expense Tracker
- Adding a new expense record to the list
- Requires date, amount, category and remarks in proper format
- Test case:
add d/2022-03-24 a/9.50 c/Movie r/Jujutsu Kaisen- Expected: Expense record is added to the list and details are shown on the console.
- Test case:
add d/Invalid Date Field a/9.50 c/Movie r/Jujutsu Kaisen- Expected: Expense record not added due to invalid date format. Error details are shown on console.
- Test case:
add d/2022-03-24 a/Invalid Amount Field c/Movie r/Jujutsu Kaisen- Expected: Expense record not added due to invalid amount format. Error details are shown on console.
- Test case:
add d/ a/ c/ r/- Expected: Expense record not added due to missing values. Error details are shown on console.
- Test case:
add m/- Expected: Expense record not added due to missing fields. Error details are shown on console.
- Test case:
add d/2022-03-24 a/500 c/Car r/Slash /in middle- Expected: Expense record not added due to slash in invalid position. Error details are shown on console.
- Deleting an expense record after listing
- Prerequisites: List all expense records using the
listcommand. Multiple records exist in the list. - Test case:
rm 1- Expected: First expense record is deleted from the list. Details of the deleted record shown in status message.
- Test case:
rm 0- Expected: No module is deleted from the list. Error details shown on console.
- Other incorrect delete commands:
rm- Expected: Error message similar to step 3.
- Prerequisites: List all expense records using the
- Editing an existing expense record
- Prerequisites: Expense record exists in the list.
- Test case:
edit 1- Expected: Retrieves first expense record and asks user for field to edit.
- Test case:
edit 0- Expected: No expense record is retrieved to be edited. Error details shown on console.
- Test case:
edit 1INVALIDFIELD randomvalue- Expected: Retrieves first expense record, but does not edit any field due to unknown field parameter. Error details shown on console.
- Finding a specific expense record
- Prerequisite: Expense record exists in the list and contains the word “test”.
- Test case:
find test- Expected: Retrieves expense record which contains the word “test”
- Test case:
find notest- Expected: No expense record retrieved as keyword is not found in any record.
- Test case:
find- Expected: No expense record retrieved as keyword not specified. Error details shown on console.
- Expected: Error messge similar to above.
Contacts Manager
- Adding a new contact
- Test case:
add n/Name1 f/Faculty e/email@u.nus.edu d/Description
Expected: A contact with the above fields will be added to the list. Details of the added contact shown in the status message. New number of contacts in the list are also shown. - Test case:
add e/email@u.nus.edu d/Description n/Name2 f/Faculty
Expected: Similar to the previous. - Test case:
add n/Name3 f/Faculty e/invalid email d/Description
Expected: Similar to the previous, with reminder that the email may be invalid. - Test case:
add n/Name1 f/Faculty e/email@u.nus.edu d/Description
Expected: No contact is added. Error details shown in the status message, indicating thatName1is already in the list of contacts. - Other incorrect delete commands to try:
add(no fields),add n/(invalid fields),add f/fac d/desc(missing fields), … - Note that any input between the
addcommand and the first delimiter are ignored
- Test case:
- Deleting a contact while all contacts are shown.
- Prerequisites: Show all contacts using the
listcommand. Ensure that there are contacts in the list. A message will be shown to indicate an empty list. - Test case:
rm 1
Expected: First contact is deleted from the list. Details of the deleted contact shown in the status message. Number of contacts left in the list are also shown. - Test case:
rm 0
Expected: No contact is deleted. Error details shown in the status message. - Other incorrect delete commands to try:
rm,rm x(where x is negative or larger than the list size),rm not_a_number, …
Expected: Similar to previous.
- Prerequisites: Show all contacts using the